
 | Project - Notes |
|
|
| ||||||
|
Home Project News February 3, 2021 Project Log FAQ Project Notes Project Summary Guestbook Other Stuff | I don't really know how we did it but with four people it only took us about a half hour to get the engine mounted. I guess there were really two tricks... Dan Checkoway (www.rvproject.com) warned me that the engine needs to be hung from one point. The problem with using the Airflow Performance Fuel Injector is that the flow divider on top is fairly big. This means that you can't really get that hoisting strap on that center bolt of the engine. So instead there are two straps on the front and back of the engine. 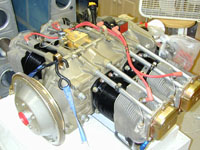 Dan warned that when he used both points to lift the engine that made it very difficult to rotate the engine fore and aft to get the right alignment. I found that using the strap on the back of the engine worked okay but I needed somebody to lift up on the ring gear. It was a little hard on Charles (Thanks a million Charles) to hold the ring gear that long but a couple of rags seemed to help. It worked okay and was a lot less effort that removing the flow divider and moving the strap temporarily. The other thing that we did that I think helped was to start at the bottom (like the manual says) The first bolts to go in are the easiest and each one is progressivly more difficult. We put the bottom two in fairly quickly and there was enough slack in the mounts to allow us to lower the engine until we could slide the top mounts in. Then we got one of the top mounts in and that was it. There was no way the forth was going to go in, so I tighted up the three we had and this pulled the engine into the right position and the fourth bolt went right in. Also don't forget that the top mounts and the bottom mounts have different arrangements for the rubber bushings. The hard bushing (the one with the step in it) should be in compression. This puts it on the back side of the engine mount on top and the front side on the bottom. The plans mention this and it's clearly on the prints but I wanted to mention it. Just make sure you have it squared away in your brain before you get all those bolts in. Oh and don't forget the extra washer on the bottom and remember that the top and bottom bolts are different lengths. |