| Project Log - July, 2003 |
|
|
| ||||||
|
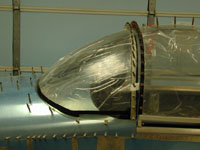
Home Project News February 3, 2021 Project Log Empennage Horizontal Stabilizer Vertical Stabilizer Rudder Elevators Rudder II Wing Kit Wings Fuel Tanks Ailerons Flaps Fuselage Kit Bulkheads Aft Section Foreward Section Top Fuselage Cabin Finish Canopy Cowling Electrical Firewall Forward Fuel System Engine Baffles Misc Miscellaneous Fiberglass Assembly Panel Finishing Up! FAQ Project Notes Project Summary Guestbook Other Stuff | I trimmed the canopy a little more. I still had it overhanging the side rails a bit and missed the part in the book where it said to cut it to just above the rails.
I almost finished drilling the canopy to the frame. I left the aft bow undone because the sides were a little long so I trimmed a little bit of the sides to make it fit better. I didn't feel like drilling those holes while I was tired so put the latch mechanism together.
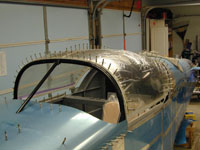
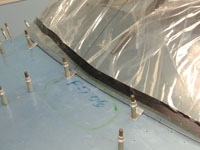
Finished drilling the canopy frame. Marked the sides to the final cut line and started trimming all of the excess from the edges of the canopy.
Finished trimming the edges of the canopy and spent quite a bit of time polishing the edges so that they were nice and smooth and rounded. Also match drilled the cover strip to the top of the canopy and almost finished countersinking the holes.
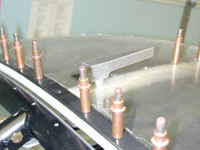
Finished countersinking and enlarging all the holes in the canopy bubble. Enlarged the holes in the canopy frame to #30. Tweaked the canopy frame some more to get it to fit just right and reassembled the whole mess. It actually fits pretty well. I guess all that aggrivation with the canopy frame paid off.
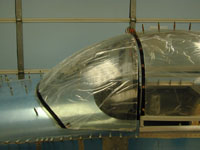
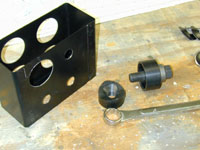
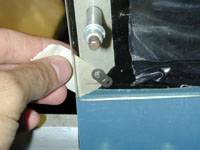
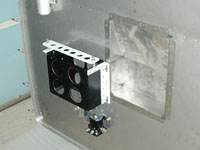
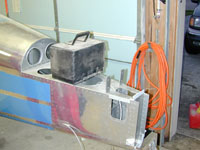
Trimmed and tried the windscreen several times. It's a trial and error kinda thing but it's getting closer every time I try. Trimmed some more on the windscreen. Finished trimming the windscreen. It took a long time but I think I have a pretty good fit. It may still need a little bit of tweaking. I also spent some time getting the edges of the windscreen rounded and smooth. I set the height of the canopy frame to match the roll bar. I almost finished drilling the holes in the slider tracks out to full size. I want to get the slider tracks nailed down before I drill the rollers to the canopy frame, so that I can run the canopy back and forth and make sure it is going to be smooth. Finished drilling the holes for the slider tracks. I also put a couple of screws in the tracks so that I could slide the canopy back and forth to check the alignment of the rollers. I drilled the rollers to the canopy frame, and I also started drilling the windscreen to the roll bar. I finally remembered to borrow the 2" Greenlee punch from work so I worked a little more on the battery box. The 2" punch is for the lightening holes. The circle cutter was just not gonna work on the steel, but the punch worked really well.
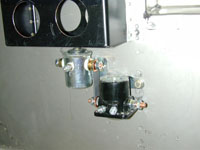
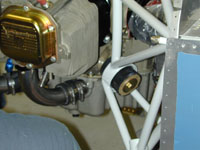
Finished the battery box and started installing the nutplates and doubler plates on the firewall for mounting the battery and starter contactors.
Finished mounting the contactors and made the copper bar that connects the two together.
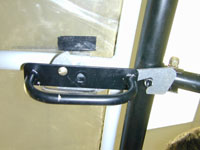
Finished drilling the windscreen to the roll bar. Drilled the little clips that hold the windscreen down to the forward skin. Countersunk and enlarged all the holes in the windscreen. The windscreen is held to the roll bar with screws so I tapped all the holes in the roll bar for the #6 screws. Finished the latch mechanism, except I didn't trim the hook all the way yet. I want to wait until I get the rear track and anchor blocks down before I commit to that size. Drilled and screwed down the rear canopy track, even though by the manual this should be done after the anchor blocks it seems to me that it would work out better if I nail that track down first. We'll see.
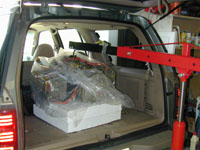
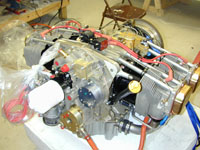
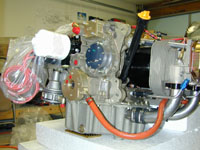
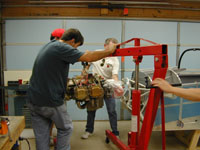
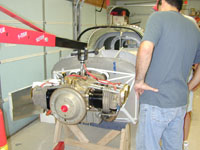
Steve came over and helped me unload the engine.
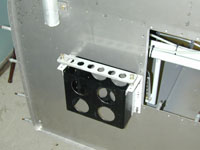
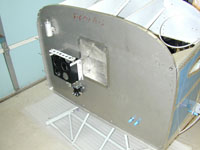
A couple of the screws on the rear canopy track were still sticking up a little bit so I tweaked the countersinks a little. Also Messed around with the little anchor blocks that hold down the rear of the canopy. Drilled some lightening holes in the center rudder pedal brace and riveted it to the firewall. Riveted in the firewall recess with a little Pro-seal. Mounted the battery box to the firewall. Installed the engine mount but I didn't get the bolts tight, I'll need some help on that one. I also tried to get the governor installed on the engine but I am not quite sure that I have the right studs. I'll check with the mailing lists tomorrow and see what gives.
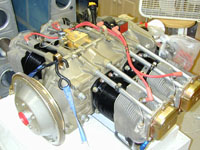
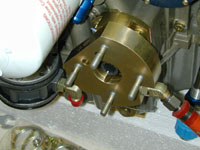
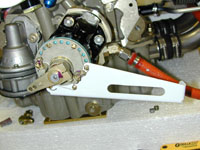
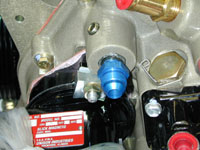
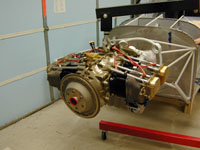
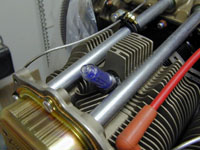
Trying to get ready to hang the engine. I mounted the prop governor, and the governor control bracket. It isn't going to work like that because the the control cable will have to run through my battery. I don't really want to drill a hole in my battery so I need to figure out how to fix it. I installed the fittings for oil pressure, manifold pressure, fuel pressure and the oil cooler lines in the back of the engine.
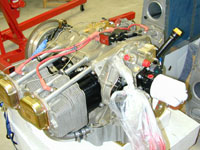
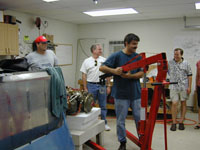
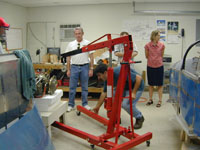
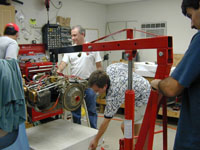
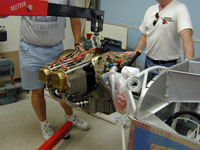
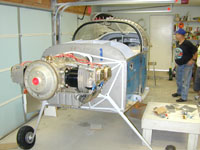
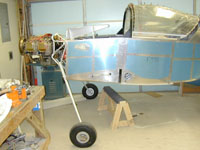
I figured that I would try to rotate the plate on the back of the prop governor to and it worked. I put the remote sender manifold on the firewall. Everybody started showing up for the engine hanging party and after some RV talk and hamburgers we managed to get the engine on the mount. It went really smooth and only took about a half hour. After the engine was on everybody that showed up decided that they didn't like my sawhorse under the fuselage idea and we decided to put it up on the gear. I hadn't put the wheels or anything together yet so we had to do all that. With all the people that were there it only took a couple of hours, but we didn't do the brakes or the wheel pant mounting hardware. We just did enough to get the wheels on. Thanks everybody that came over to help. Marshall, Steve, Charles, Clay, David and Darin all helped. I also have to thank my wife, Shannon, for the burgers and cake, it was a lot of fun.
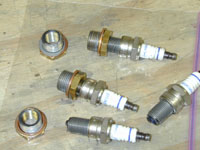
Covered all the holes in the engine and made sure all the open fittings had covers. Put all the cotter pins in the engine mount, and while I was at it I put some cotter pins in the rudder pedals where I had run out earlier and since I was in the cabin anyway I went ahead and tightened up all the rudder pedal hardware. Spent some time sorting through drawings and cleaning the place up it was getting to be a real mess. Installed the deyhdrator plugs into the top spark plug holes. Punched the hole for the cabin heat box. I had to install the fuel injection servo temporarily so that I could locate the holes for the mixture and throttle cables to pass through the firewall. I punched those holes as well as the hole for the mixture cable.
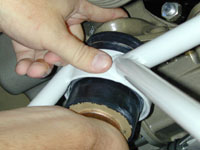
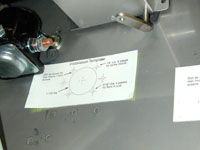
I drilled the holes for the cabin heat box to mount to the firewall. I have decided to use screws and nutplates instead of rivets since I may have to remove the box to get to the prop governor. Adjusted the rear of the canopy down a little bit because the rear anchor point pin was going to go into the block a little bit high. it still is a bit high for my liking and it looks like the weldment is different from one side to the other, so I also made a 1/8" shim to go under the anchor block hold down. I bet nobody will notice it as long as we don't tell anybody. |